Tutorial: Nancy + MongoDb + AppHarbor
Time for a quick tutorial on how to get a site up and running on AppHarbor using Nancy and MongoDb.
First up you are going to need Git installed. On windows my preference for Git is this kit http://code.google.com/p/gitextensions/. It installs everything you need and gives you a nice GUI to work with plus some basic integrations with Visual Studio.
(Just in case you have missed the craze that is Git, it is a version control system. A very good one. Go learn about it)
Next you will need NuGet.
(In case you missed nuget, it is a package manager for .NET development. Use it to maintain third party libraries you are using in your applications)
Finally, you are also going to need an account at AppHarbor.
(In case you have missed AppHarbor, it is a new form of hosting for asp.net web applications. You push your code to their server, they build it, run your unit tests and then deploy it. From there you can scale the application and install add-ons etc.)
The end result of this tutorial is the app hosted on AppHarbor here http://nancymongo.apphb.com/ which is a basic message posting app that I have used before when playing around with Nancy. It super simple and boils down to two api methods with a page to interact with them.
All the code is on GitHub here https://github.com/csainty/NancyMongo
Setting up AppHarbor
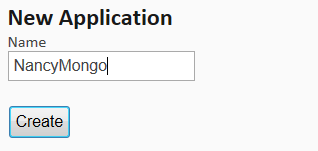
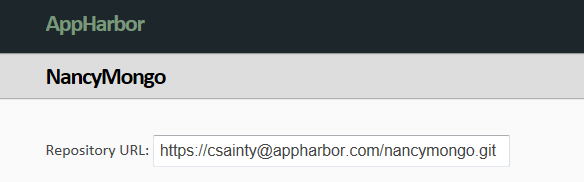
We are going to start with AppHarbor, once you have an account set up, go to the Applications page and create a new application.
This will give you the URL for your git repository where we will later be pushing the code. So keep this page open or the URL handy.
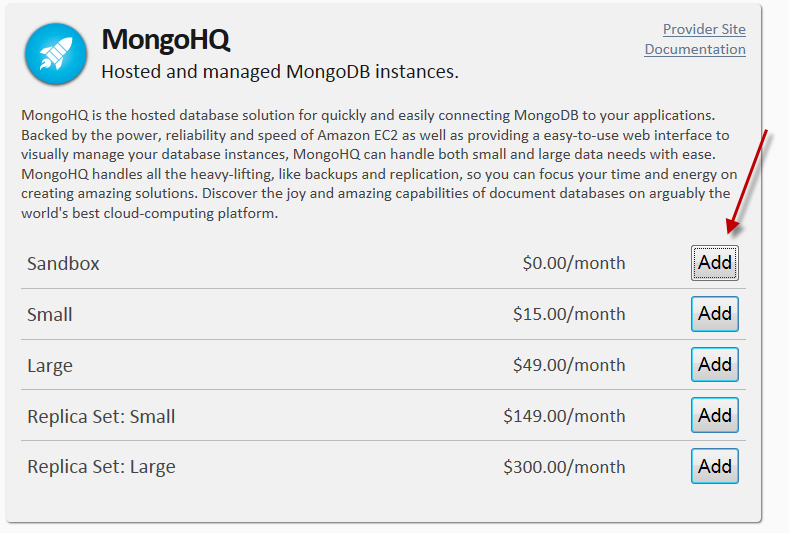
Down the bottom of this page is an Add-ons section. Hit “View Available Add-ons”
As you can see there are quite a few, since we are using Mongo here, Click through to MongoHQ.
MongoHQ are a hosted MongoDb provider, they are partnered up with AppHarbor so that it is a single click install to create an instance on their servers for your AppHarbor site. Even better, the build process on AppHarbor will perform a replacement on your web.config file to insert the correct URL to the instance. So you can have a development/testing server configured locally and when you push to the server it will switch to the production server for you!
Add the free sandbox MongoDb instance to your site.
You should be sent back to the application page with a message saying your instance is configured. Now if you click through to the “Variables” tab you can see a MONGOHQ_URL variable. Any values set up in this tab will be added/replaced in the AppSettings section of your web.config file at build time.
We are going to break with convention here a little. Normally you do not need to know the value of that key since it is the production server. But to save us setting up test/dev MongoDb instance on our own machines, we are going to point at it for development as well. There is some CSS on the page that truncates the value, but if you view source and search for mongodb:// you can get the full value.

It includes your username, password and database name. So don’t go sharing this value, and if you are pushing your code to the public, make sure you remove it first, like I have.
Keep that value at hand, it’s time to jump into Visual Studio.
Building our App
Create a new ASP.NET Empty Web Application.

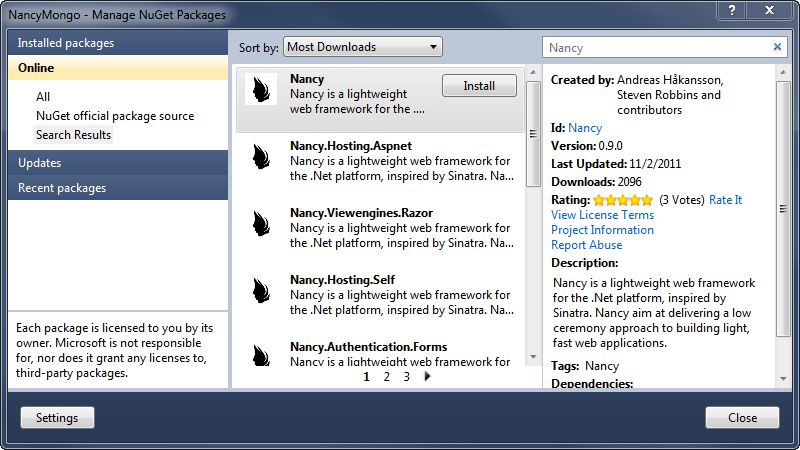
Fire up NuGet, either the GUI from right clicking the references folder in your project and choosing Manage NuGet Packages, or from the command line.
Install the following packages by searching for them and hitting the install button
- Nancy
- Nancy.Hosting.AspNet
- KnockoutJS
- Official MongoDb C# driver
- NuGetPowerTools
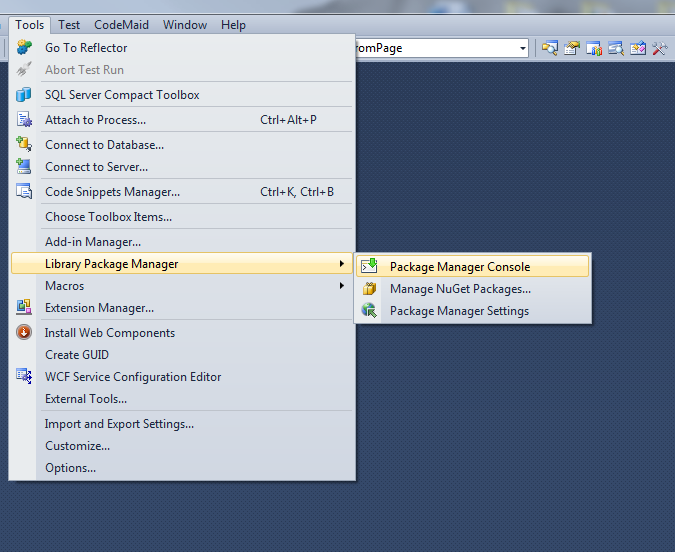
One more thing with NuGet, we are going to need to jump into the NuGet “Package Manager Console” from the Tools menu | Library Package Manager sub-menu
Once the console loads type enable-packagerestore and hit enter.
This command was added by the nugetpowertools and adds a build step into your project file that ensures all the nuget dependencies have been downloaded. This is very useful since you are not going to be uploading a compiled application to AppHarbor, you are sending up your source which is built on their servers. So you have to give them the dependencies some way, and the alternative is to commit them all to your git repository. Doing this bloats your repository for no good reason. Trust me, this step is worth doing on every project you use NuGet for.
Once that completes you can close the package manager console.
Now open you your web.config file and add an AppSetting of MONGOHQ_URL with the value you grabbed from AppHarbor.

Just to stress this point one more time, normally you are going to have a dev/test server. You would be putting it’s URL in here and letting AppHarbor override it with the production URL when you publish.
Now on to some code, to start with add a Models folder with a single Message.cs class.
using MongoDB.Bson.Serialization.Attributes;
using MongoDB.Bson.Serialization.IdGenerators;

namespace NancyMongo.Models
{
    public class Message
    {
        [BsonId(IdGenerator = typeof(StringObjectIdGenerator))]
        public string Id { get; set; }

        public string Content { get; set; }
    }
}
Note the Attribute on the Id field, this tells the MongoDb driver which field is the id and how to generate an id for that field. There are many different options for id generation, we are using one of the string methods.
Now we are going to need a bootstrapper CustomBootstrapper.cs to configure Nancy and our Dependency Injection.
using System.Configuration;
using System.Linq;
using MongoDB.Driver;
using Nancy;
using Nancy.Conventions;
using NancyMongo.Models;
using TinyIoC;

namespace NancyMongo
{
    public class CustomBootstrapper : DefaultNancyBootstrapper
    {
        protected override void ConfigureConventions(NancyConventions nancyConventions) {
            nancyConventions.StaticContentsConventions.Add(StaticContentConventionBuilder.AddDirectory("Scripts"));
        }

        protected override void ConfigureApplicationContainer(TinyIoCContainer container) {
            var connString = ConfigurationManager.AppSettings["MONGOHQ_URL"];
            var databaseName = connString.Split('/').Last();
            var server = MongoServer.Create(connString);
            var database = server.GetDatabase(databaseName);

            if (!database.CollectionExists("Messages"))
                database.CreateCollection("Messages");

            container.Register<MongoServer>(server);
            container.Register<MongoDatabase>(database);
            container.Register<MongoCollection<Message>>(database.GetCollection<Message>("Messages"));
        }
    }
}
Bootstrappers are the starting point for all Nancy sites that do a bit more than Hello World.
First we are adding the Scripts folder as a static content folder. This tells Nancy to automatically handle requests to the Scripts folder as static file requests. The Content folder is added by default, though we don’t use it in this project. There are a number of overrides on the builder we are using here to customise how the mapping works.
Next we hook up dependency injection on the various MongoDb driver classes we might want to get a handle on. This localises all our creation and init code so that our Modules can just request what they need and let the injection container provide it.
Basically we are creating our Server instance using the connection string from web.config then pulling the database name off this connection string to grab our Database instance, we then create a Collection for our Messages to be stored in. The C# MongoDb driver actually manages it’s own object life time, so even if we called MongoServer.Create() multiple times we would always get back the same instance, but I still like to use Dependency Injection rather than have to create these time and time again in my module code.
So let’s look at the two Modules (PageModule.cs and ApiModule.cs)
using Nancy;

namespace NancyMongo
{
    public class PageModule : NancyModule
    {
        public PageModule() {
            Get["/"] = HomePage;
        }

        private Response HomePage(dynamic parameters) {
            return View["HomePage"];
        }
    }
}
using System.Linq;
using MongoDB.Driver;
using Nancy;
using NancyMongo.Models;

namespace NancyMongo
{
    public class ApiModule : NancyModule
    {
        private readonly MongoCollection<Message> _Messages;

        public ApiModule(MongoCollection<Message> messages)
            : base("/api") {
            _Messages = messages;

            Get["/messages"] = GetMessages;
            Post["/messages"] = AddMessage;
        }

        private Response GetMessages(dynamic parameters) {
            return Response.AsJson(_Messages.FindAll().SetLimit(100).ToArray());
        }

        private Response AddMessage(dynamic parameters) {
            if (!Request.Form.Message.HasValue)
                return HttpStatusCode.BadRequest;

            _Messages.Save(new Message {
                Content = Request.Form.Message
            });

            return HttpStatusCode.OK;
        }
    }
}
A Module in Nancy is where we wire up how the web server is going to response to requests. I cover it off in this blog post as well. We inject the Messages collection straight into our Api module without having to worry about how it is being created, or what it’s lifetime is.
Then finally we have the View (Views/Homepage.html), which is essentially a static HTML page and is processed by the built in view engine.
<!DOCTYPE HTML>
<html>
<head>
    <title>Nancy Mongo Demo Page</title>
    <link type="text/css" href="http://ajax.aspnetcdn.com/ajax/jquery.ui/1.8.10/themes/humanity/jquery-ui.css" rel="stylesheet" />
</head>
<body>
    <h1>Nancy Message Demo</h1>
    <p>
        A demo page for using Nancy + MongoDb + AppHarbor. See <a href="http://blog.csainty.com">here</a>
    </p>
    <h2>Messages</h2>
    <ul data-bind="foreach: messages">
        <li data-bind="text: Content"></li>
    </ul>
    <h2>New Message</h2>
    <p>
        Enter your message and hit submit. The message will be saved in MongoDb on the server and redisplayed.
    </p>
    <p>
        <input type="text" data-bind="value: messageText" />
        <button data-bind="click: sendMessage">Submit</button>
    </p>
    <script src="https://ajax.googleapis.com/ajax/libs/jquery/1.6.4/jquery.min.js" type="text/javascript"></script>
    <script src="https://ajax.googleapis.com/ajax/libs/jqueryui/1.8.16/jquery-ui.min.js" type="text/javascript"></script>
    <script src="/Scripts/knockout-1.3.0beta.js" type="text/javascript"></script>
    <script type="text/javascript">
        var viewModel = {
            messages: ko.observableArray([]),
            messageText: ko.observable(''),
            sendMessage: function () {
                $.ajax({
                    url: '/api/messages',
                    data: { message: this.messageText() },
                    type: 'POST',
                    success: function (result) {
                        viewModel.messages.push({ Content: viewModel.messageText() });
                        viewModel.messageText('');
                    }
                });
            }
        };
        ko.applyBindings(viewModel);

        $(function () {
            $('button').button();
            getMessages();
        });

        function getMessages() {
            $.ajax({
                url: '/api/messages',
                dataType: 'json',
                cache: false,
                type: 'GET',
                success: function (result) {
                    for (var i = 0; i < result.length; i++) {
                        viewModel.messages.push(result[i]);
                    }
                }
            });
        }
    </script>
</body>
</html>
So now we have all the code files in place, run it up and make sure it all works, when it does, it is time to deploy.
Creating our Git Repo
Now we have a working project, lets put it into Git and send it up to AppHarbor.
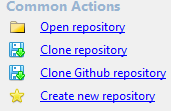
Fire up the GitExtensions GUI and select “Create new repository”
Choose the folder your solution is in and Initialize as a personal repo. (Pro tip: Init a bare repository in your dropbox/mesh folder and push to it for easy offsite backup)

Now you need to edit your .gitignore folder to tell it what files to include and exclude from your folders.
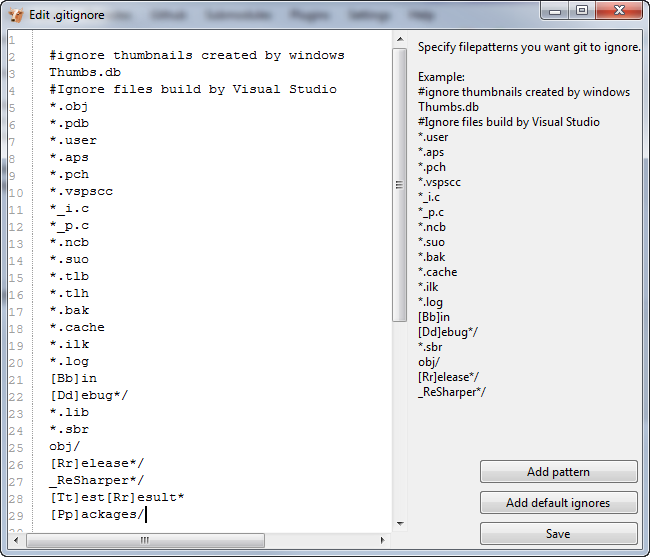
Start by hitting the “Add default” button, remove the *.exe line as we want to include the nuget.exe which was added by NuGetPowerTools. Then add a line [Pp]ackages\ at the bottom to filter out the packages folder. This folder contains all the NuGet packages which will be downloaded on the AppHarbor build server by NuGetPowerTools.
Now you should be able to Commit the changes from the Commands menu.
Deploying to AppHarbor
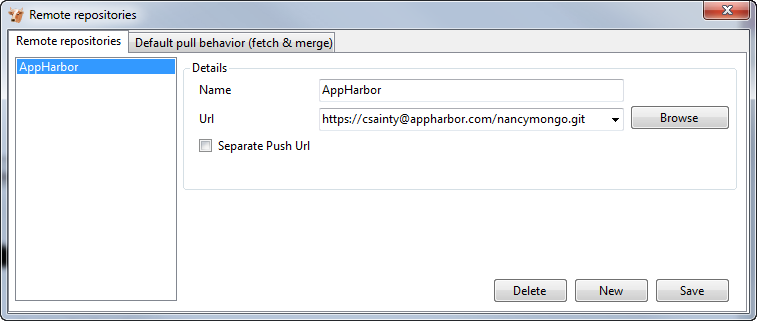
Still in GitExtensions, from the Remotes menu choose “manage remote repositories”, click the new button, give it a name and paste in the Git url you were provided when creating your AppHarbor application. Remotes are simply other copies of a repository that you can push code to and pull code from.
You can then “Push” to this remote (again from the commands menu), which will being the build and deployment process on AppHarbor.
One thing to watch out for, with OpenSSH selected as your SSH client (chosen when installing Git Extensions) you will have a black window pop up during the push, this is actually asking you for your AppHarbor password, type it in, or right-click and paste (Dont Ctrl-V) and press enter. Not sure what happens if you are using PuTTY.
If I get a chance I hope to look into the GitExtensions code and improve this if at all possible.
It Lives!
Now if you go back to your application page in AppHarbor and refresh you should be presented with something like this.
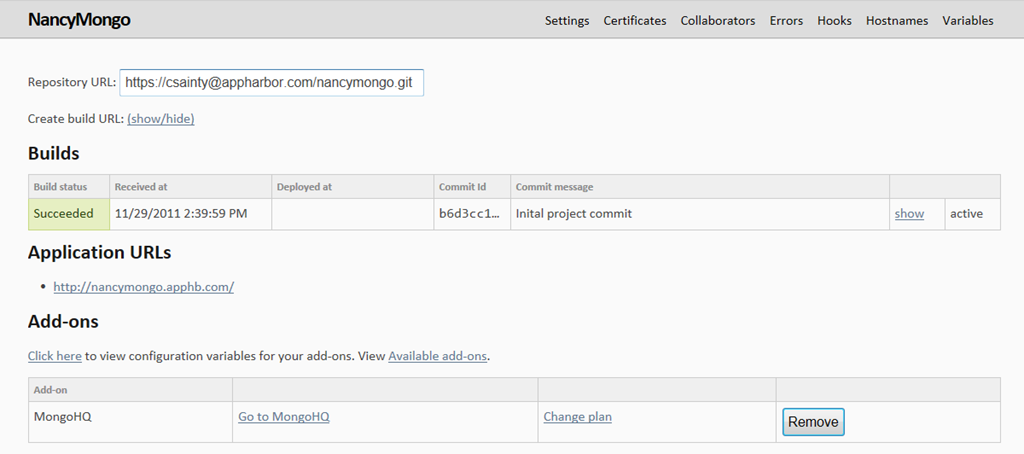
You will have the status of your build, which you can dig into to get the full console output from the build process. Assuming the build worked, you will also have a link to your app. Click it and be amazed.